How to Fix Serve Images in Next-Gen Formats Issue in Blogger?
Do you want to know how to fix the “server images in Next-Gen format” error that you get in the page speed insight report?

Well, In this blog post I will show you how to fix this error and upload and serve Webp format correctly on the Blogger website.
As the images are the important part of a website and almost takes 80-90 percent of the total page size, optimizing it is very necessary.
You can easily boost your website speed significantly, just by optimizing it properly and serve them in a next-gen format like webP, AVIF, JPEG 2000, etc.
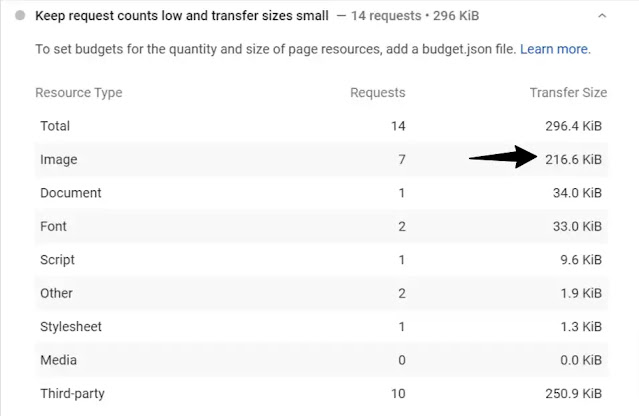
Here, let’s understand this with an example. Let’s copy the Homepage URL of this website and test the speed in the page speed insight tool.


Here in the above screenshot, you can see images are taking around 216KB out of a total page size of 296KB.
If we calculate this then images are taking around 72% of the total page size. That’s why you should focus on Optimizing images first before anything else.
That’s why You need to use the next-gen image format in your website and implement the lazyload of images in your blogger website.
So, let’s understand why Webp is recommended by page speed insight and how you can use this image format in your blogger website.
What are next-gen image formats?
Next-gen image formats provide better compressions while maintaining the image quality compared to classic image formats like PNG, JPG, GIF, etc.
These image formats are encoded in such a way that they will load faster and consume less cellular data on the web.
Some of the next-gen image formats are AVIF, WebP, JPEG 2000, etc.
AVIF is currently supported in Chrome and Opera browsers and provides better compression than any other image format with the same quality settings.
Why WebP?
While on the other hand, Webp images supported most of the modern browsers like Chrome, Firefox, Safari, Edge, Brave, and Opera. It provides better lossy and lossless compression compared to PNG, JPG, etc.


As the webp is supported in most of the browsers, it is recommended to use webp instead of any other next-gen image formats.
WebP lossless images are 26% smaller than JPEGs. WebP lossy images are 25-34% smaller than JPEGs with an equivalent quality index.
Webp is developed by Google and you can see the webp index support in Google search engines. So, you can use this format without worrying about indexing issues.
How to Convert Images to WebP?
There are various ways you can convert your JPG or PNG images to WebP images. You can either use the Online tools or use software or APP on your device.
Method-1: Using an online tool
To convert your existing images to webp search for webP converter in Google and you will see a list of websites.
I prefer to use the Ezgif webp converter. Here you can convert your JPG, PNG & GIF images to webp images with better compression and image quality.


Here, just upload the image from your computer or put the URL of the image and it will automatically convert the image to webp format and you can easily save the new image to your computer.
Or you can generate a permanent file link that you can use on your website.
You can also further optimize the webp images and set the lossy compression rate and reduce the image file size.
Method-2: Using a Computer software
I prefer to use the second method as it saves time and I don’t need to upload images to compress it. And I can convert my existing images to webp format in bulk just by selecting all images.
I use the File converter software which is free and open-source software.


After downloading and installing this software, just right-click on the image and you will see the option to convert your file.
How to Use Webp images in Blogger correctly?
To use the webp images, first of all, convert your existing images to webp and upload the image using the regular blogger upload tool.
After uploading the image, switch the editor to HTML view and you have to find the image URL.
By default, the image URL looks like this as shown in the below URL.


Here, you have to modify the Image URL a little bit to serve the image in next-gen format. (Here webp)
You have to add -rw after the w640-h416 in the file URL and after that Blogger will support the WebP image.


You can also see different URL according to the file size and whether it is set to S, M, L, XL, or original.
You can see formats like s16000, w400-h151, etc. Just add -rw after this in the URL.
This is a bit technical so do it correctly. I strongly recommend you to watch the below video where I have explained how to use the webp format image in blogger in the right way and fix the server image in next-gen format error.
Now, You have successfully added the webp images to your blogger website. Now check the page speed again in the page speed insight tool and you will not see any error of it.
Update: Recently Blogger has introduced the Webp functionality on the Settings. All you have to do is enable the option as shown in the below image.


In this way, you can improve your Blogger blog loading speed by reducing the overall page size.
If you have any doubts regarding webp images in blogger you can ask me in the comment section. Or you can ask your doubts in the Telegram group.
If this article, helps you then don’t forget to share the articles with your friends and Subscribe to our YouTube channel for more Tutorials like this.
You can also Hire me on Fiverr to improve your blog loading speed.


